Advertisement

Urban Terror Blogs
HappyDay's blog
I'm Looking at You - Crosshairs and Weapon Spread
posted Wednesday, 27 June 2018
There are plenty of features I'm working on for the new Urban Terror, but not many are that interesting or visual. That, combined with the fact that writing blog posts takes quite a bit of time, is the reason why you see me so rarely post updates of the progress I'm doing on the game. Recently, I've implemented the crosshairs for Resurgence and that is something worth writing about.
So, let's consider the situation in the game when shooting a bullet. The player has a marker in the middle of the screen - the crosshair, which he/she can point in any direction to help direct the bullets from the gun into the target (preferably the enemy's head). Since we want the game to require a bit more skill than to simply click when your crosshair is on a target, there is a feature called spread.
The faster you move and the more shots you fire in quick succession, the larger the spread value. Instead of drawing a line from the player to where the center of the screen is, we calculate a cone and pick a random line inside that cone as the bullet's trajectory. The spread value is used as the angle of the cone. This is what a cone with 20° angle looks like.
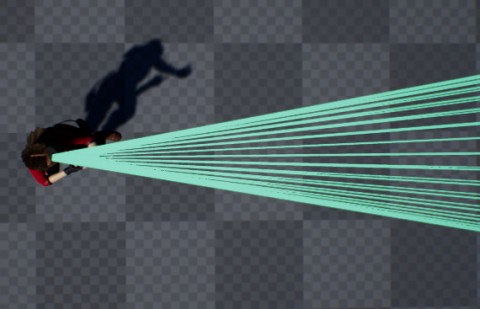
The idea is to control your movement and shooting patterns to control the randomness of your shots. Simply holding down your mouse button to fire as quickly as possible (called spray and praying) will increase the spread and the bullets will likely miss when the target is far away. Instead, you want to fire 2-3 bullets and wait a short time for the spread to decrease again before firing another couple of bullets. Crouching will decrease the spread making your shots more accurate, but at the same time making you a more or less stationary target.
Interestingly enough, a cone from the player's view will end up being a circle with constant radius on the screen, no matter how long the cone is. That is because the view of the player is a frustum (a chopped off pyramid), starting at the same point. The radius of the circle on the screen is determined by the angle of the cone, the screen resolution and the field of view. With a bit of trigonometry involved to calculate the size of the crosshair on the screen, it is possible to have the crosshair exactly match the circle described by the spread cone. That means the crosshair can accurately show the player exactly in which area the shots are going to hit. This also ensures you can reliably compare the spread of the weapons by observing the crosshair.
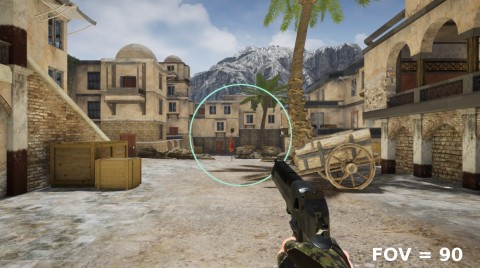
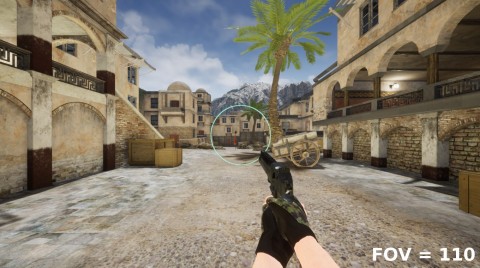
Many games use a single image file as crosshair, which gets scaled up or down. The problem with that approach is that the resolution of the texture determines how big you can scale it before it starts to look pixelated. Also, features like the width of a circle get wider with scale. More advanced crosshairs could use 5 images, one for the center and 4 for the sides, which get moved away from the center as the spread increases. That lessens the problems a bit, but you're limited in the shapes you can use. We chose a different approach. All our crosshairs are 100% procedurally generated, without any image files.
I'll explain a bit how that works in Unreal Engine 4. The basic idea is to do math on the UV coordinates of the material to create geometric shapes. The U coordinates are a simple linear gradient from 0 to 1 in horizontal direction. The same is true for the V coordinates in vertical direction.
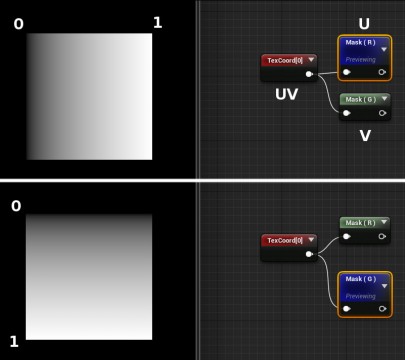
Multiplying will scale the gradient, adding and subtracting will move the gradient. With other functions like clamping or taking the absolute, you can easily create a simple line.
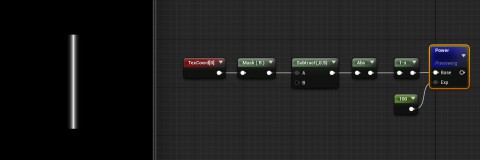
With more advanced math like using polar coordinates, it's possible to create all kinds of circular shapes. Combining a bunch of shapes can result in really interesting crosshairs. I've made extensive use of a library of complex functions I created about a year ago, which I'm also selling on the UE4 marketplace (shameless self-promotion detected). Check it out if you're interested in this sort of thing. The most awesome thing about this math-based approach is that all the values for scale, width, radius, length, color, opacity, number of lines, etc. can be adjusted in real time.
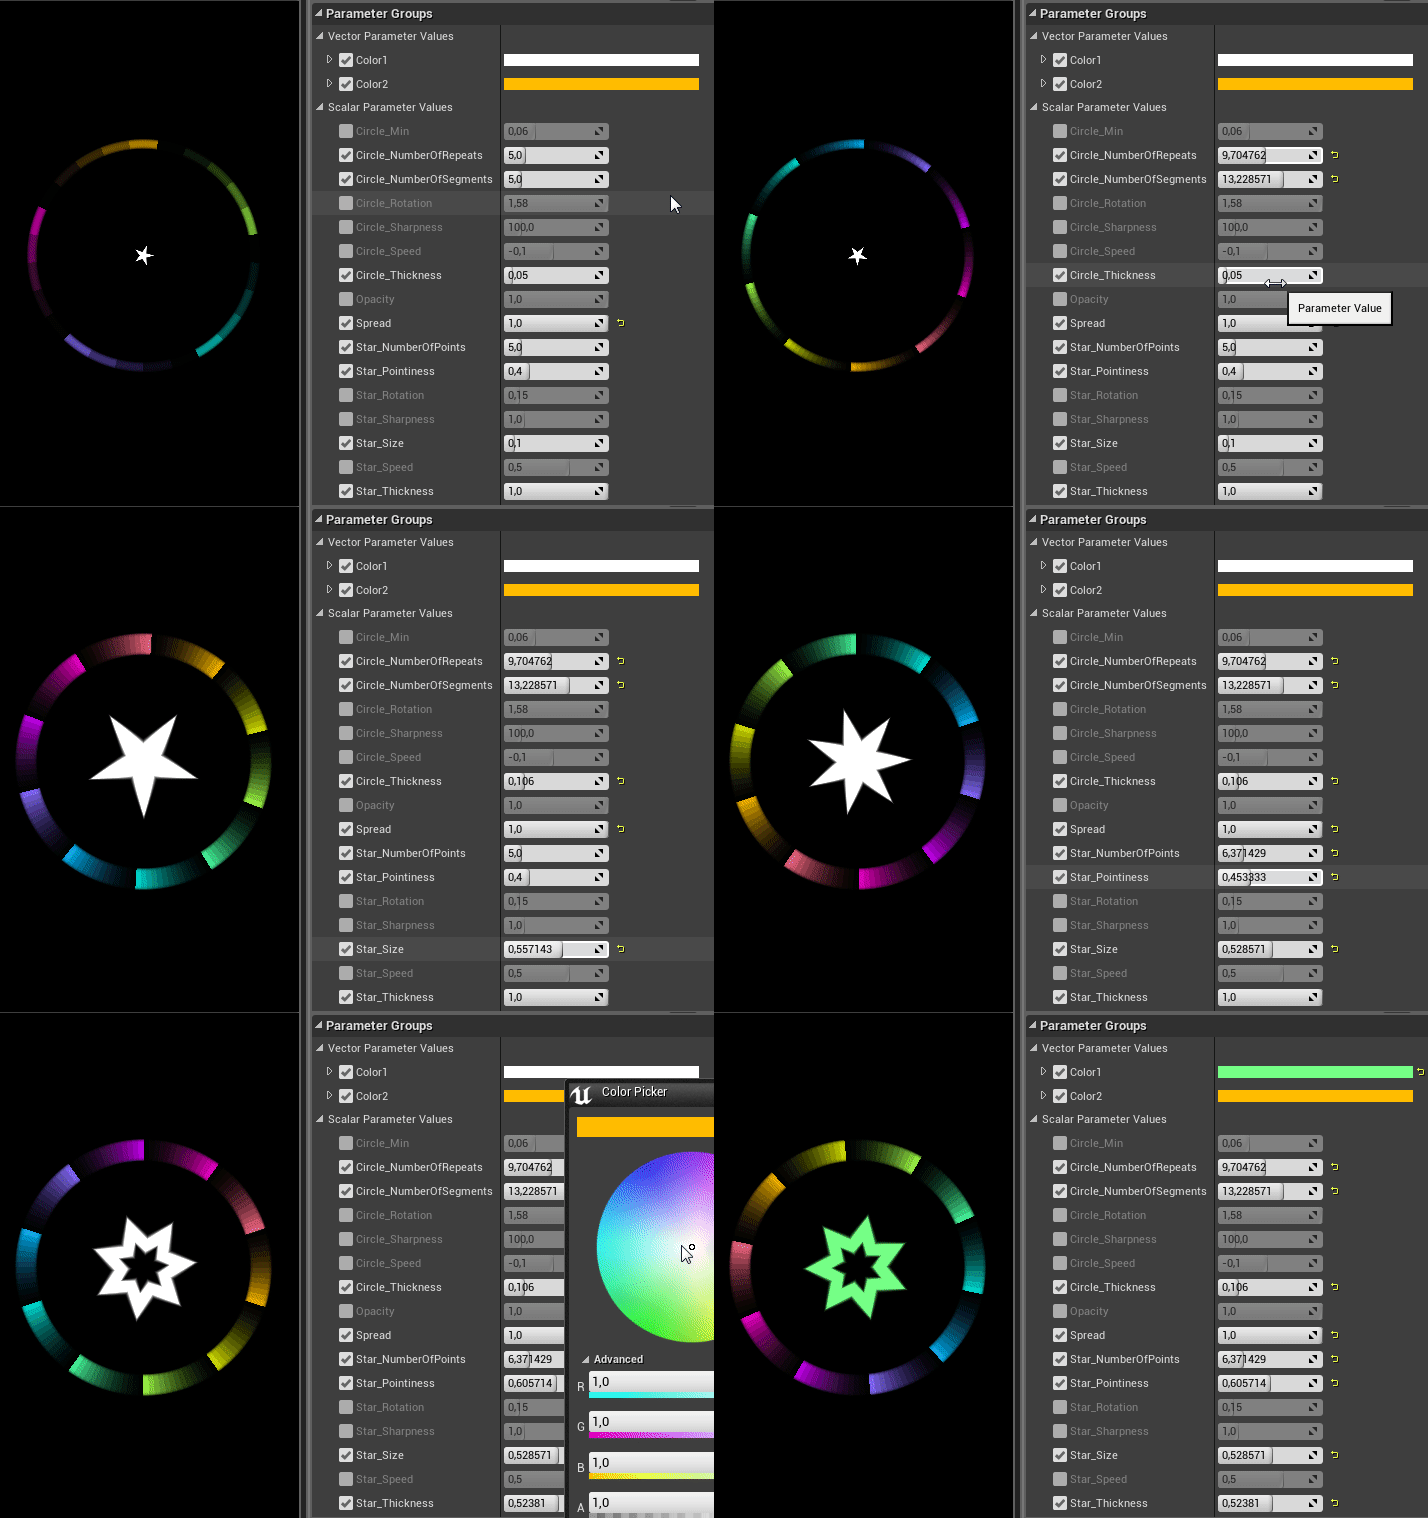
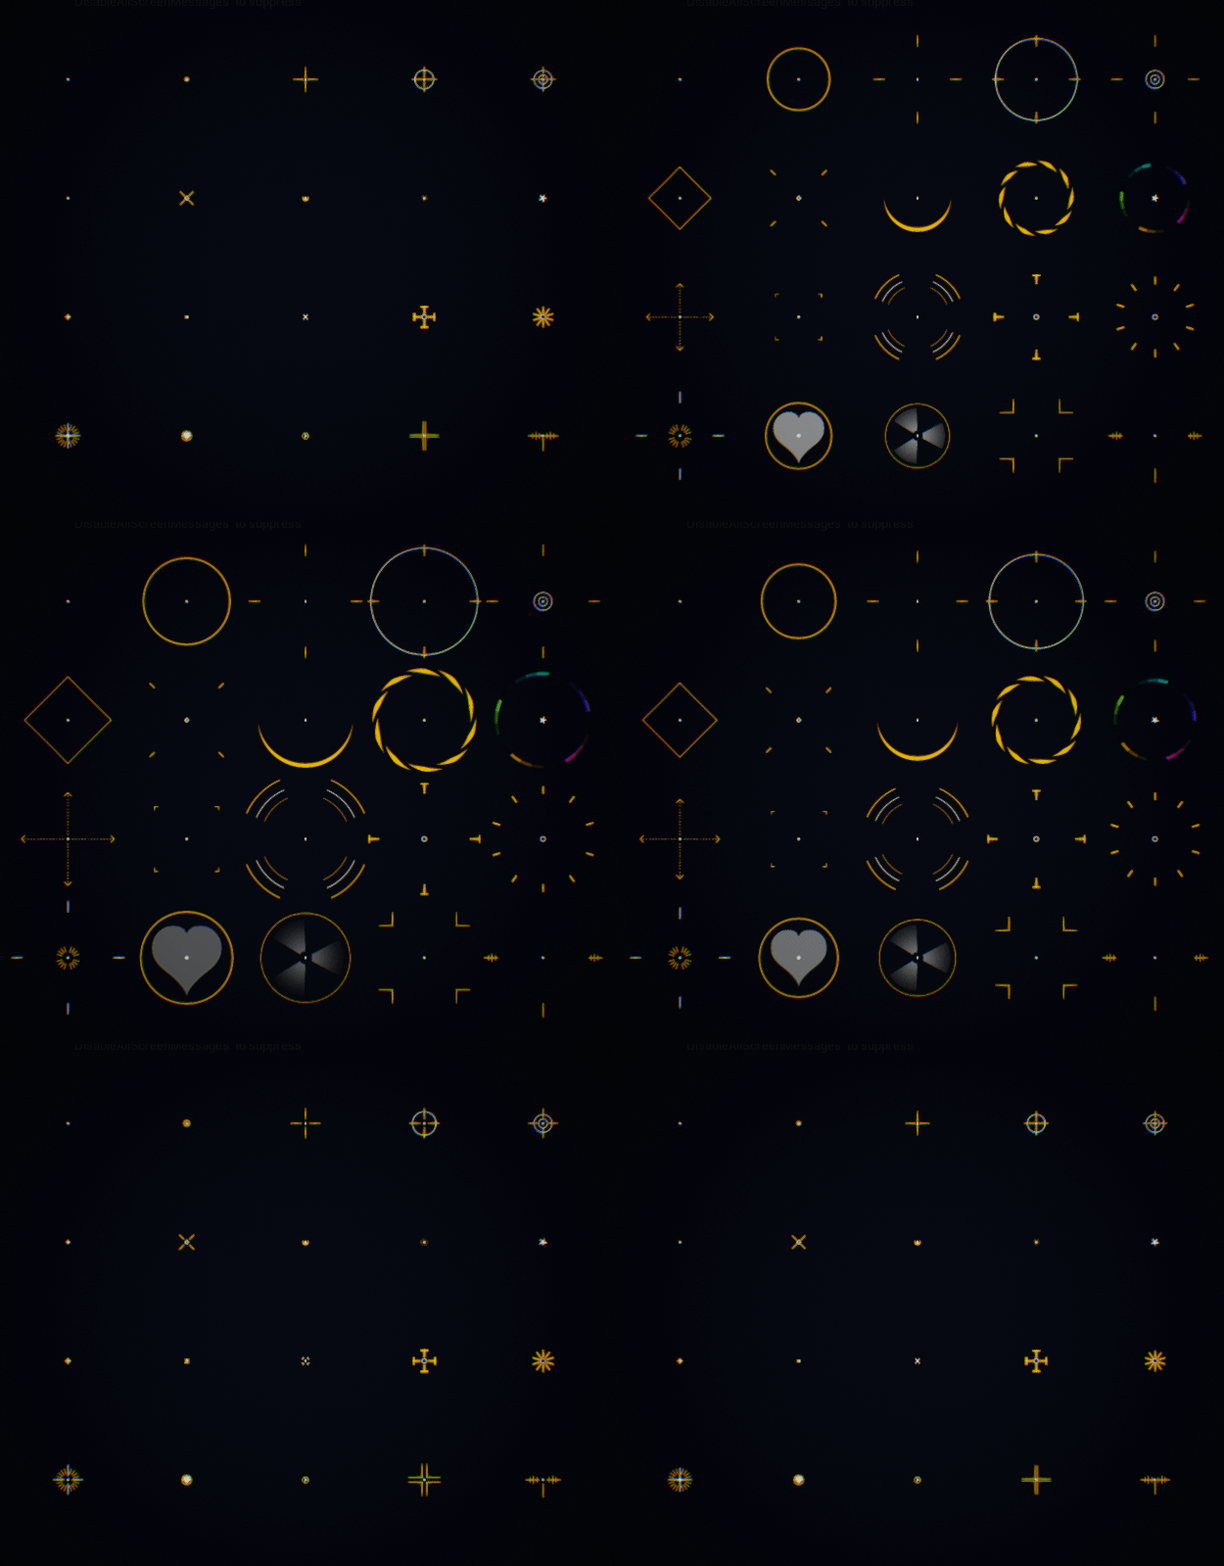
Here's a preview of the 20 crosshairs I've created so far and how they scale with the spread value between 0 and 1.
And here's a quick preview in-game.
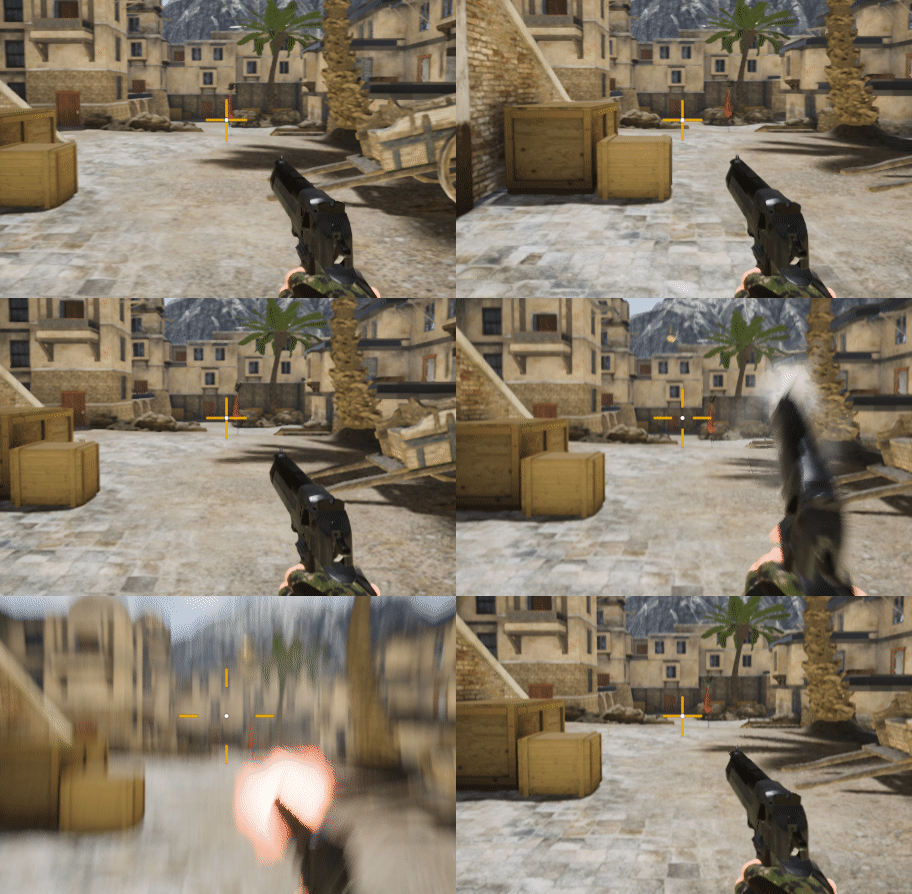
We haven't built a menu yet to select a crosshair or to adjust all the values. That's something I will do at some later point in time. Also note, there's a second feature called recoil, which moves your view a bit upwards when shooting, which I haven't mentioned here because it's unrelated to the crosshairs.
Each weapon has 4 values related to spread, which we can adjust. The formula used to calculate the spread is different from Urban Terror 4, so we can't (and don't really want to) copy the values from the old game. We are going to change these parameters a lot during development, especially once we enter more extensive private and public testing.
That's it. I hope you enjoyed reading this and maybe learned a thing or two in the process. I enjoyed working on this feature a lot and I'm really excited to have this in the game.
And as always,
Have a happy day! :)
So, let's consider the situation in the game when shooting a bullet. The player has a marker in the middle of the screen - the crosshair, which he/she can point in any direction to help direct the bullets from the gun into the target (preferably the enemy's head). Since we want the game to require a bit more skill than to simply click when your crosshair is on a target, there is a feature called spread.
The faster you move and the more shots you fire in quick succession, the larger the spread value. Instead of drawing a line from the player to where the center of the screen is, we calculate a cone and pick a random line inside that cone as the bullet's trajectory. The spread value is used as the angle of the cone. This is what a cone with 20° angle looks like.

The idea is to control your movement and shooting patterns to control the randomness of your shots. Simply holding down your mouse button to fire as quickly as possible (called spray and praying) will increase the spread and the bullets will likely miss when the target is far away. Instead, you want to fire 2-3 bullets and wait a short time for the spread to decrease again before firing another couple of bullets. Crouching will decrease the spread making your shots more accurate, but at the same time making you a more or less stationary target.
Interestingly enough, a cone from the player's view will end up being a circle with constant radius on the screen, no matter how long the cone is. That is because the view of the player is a frustum (a chopped off pyramid), starting at the same point. The radius of the circle on the screen is determined by the angle of the cone, the screen resolution and the field of view. With a bit of trigonometry involved to calculate the size of the crosshair on the screen, it is possible to have the crosshair exactly match the circle described by the spread cone. That means the crosshair can accurately show the player exactly in which area the shots are going to hit. This also ensures you can reliably compare the spread of the weapons by observing the crosshair.


Many games use a single image file as crosshair, which gets scaled up or down. The problem with that approach is that the resolution of the texture determines how big you can scale it before it starts to look pixelated. Also, features like the width of a circle get wider with scale. More advanced crosshairs could use 5 images, one for the center and 4 for the sides, which get moved away from the center as the spread increases. That lessens the problems a bit, but you're limited in the shapes you can use. We chose a different approach. All our crosshairs are 100% procedurally generated, without any image files.
I'll explain a bit how that works in Unreal Engine 4. The basic idea is to do math on the UV coordinates of the material to create geometric shapes. The U coordinates are a simple linear gradient from 0 to 1 in horizontal direction. The same is true for the V coordinates in vertical direction.

Multiplying will scale the gradient, adding and subtracting will move the gradient. With other functions like clamping or taking the absolute, you can easily create a simple line.

With more advanced math like using polar coordinates, it's possible to create all kinds of circular shapes. Combining a bunch of shapes can result in really interesting crosshairs. I've made extensive use of a library of complex functions I created about a year ago, which I'm also selling on the UE4 marketplace (shameless self-promotion detected). Check it out if you're interested in this sort of thing. The most awesome thing about this math-based approach is that all the values for scale, width, radius, length, color, opacity, number of lines, etc. can be adjusted in real time.

Here's a preview of the 20 crosshairs I've created so far and how they scale with the spread value between 0 and 1.

And here's a quick preview in-game.

We haven't built a menu yet to select a crosshair or to adjust all the values. That's something I will do at some later point in time. Also note, there's a second feature called recoil, which moves your view a bit upwards when shooting, which I haven't mentioned here because it's unrelated to the crosshairs.
Each weapon has 4 values related to spread, which we can adjust. The formula used to calculate the spread is different from Urban Terror 4, so we can't (and don't really want to) copy the values from the old game. We are going to change these parameters a lot during development, especially once we enter more extensive private and public testing.
That's it. I hope you enjoyed reading this and maybe learned a thing or two in the process. I enjoyed working on this feature a lot and I'm really excited to have this in the game.
And as always,
Have a happy day! :)
comments: Feel free to discuss this on our forums
Dragon Reborn - Raise Your Flags
posted Thursday, 07 July 2016
It's been a (long) while since my last blog post but I haven't been inactive. As you might have seen in chump's post, we do have new flag models for Urban Terror. Here's some behind the scenes info from me on the topic of flags, dragons and logos.
Let's start with flags
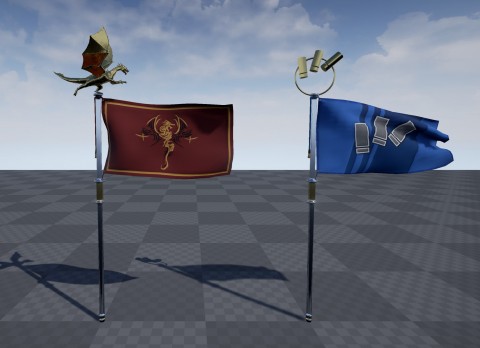
They are very similar to the old urt 4.x flags. They consist of a pole, a simple, rectangular flag cloth, pointing to the side and a golden ornament at the top. When I was working on the flags, I considered changing the shape to something more like a banner, the flag cloth hanging down from a horizontal bar. Possibly adding a second, smaller triangular cloth or other variations. Ultimately I stuck to the old, proven design. Different banner versions can always be added later for map specific flags. This time around, thanks to Unreal Engine 4's wind system, the flapping of the cloth is determined by wind sources placed in the map. It is the level designer's choice how the flags behave in each part of the map. Inside, without wind, they might just hang down, while outside they flap like a chicken that is being chased by an angry fox. Here's a short demo showing a moderately strong wind effect.
New to the game are also two cords and tassels hanging down the pole. I think that makes the flags look a bit more interesting and adds a feeling of preciousness and aesthetics to the otherwise rather simple design. The cords consist of a few physics bodies that react to gravity and any obstacles. So they will move, when a player bumps into them, or has a flag on his back and is running around.
Logos
In case you don't have a clear picture of the old 4.x flags in your mind, here's a screenshot to help you compare. As you can see, the logos have slightly changed. The blue team, the Urban Terror Response Team (UTRT) still has the three bullet shells on the striped background, but now resembling the UrT logo a bit more.
The logo of the Red Dragons has changed from a white dragon in side view to a gold and black dragon in frontal view, which in my opinion looks far better. I took both designs from nounou's awesome concept art. Here's one of them, added for your pleasure.
There also needs to be a neutral (grey) flag for some game modes, but I haven't found the time yet to work on that.
Dragon
The ornament on top of the red flag is UrT's iconic red dragon, which received a major update. Here are two in-game shots.
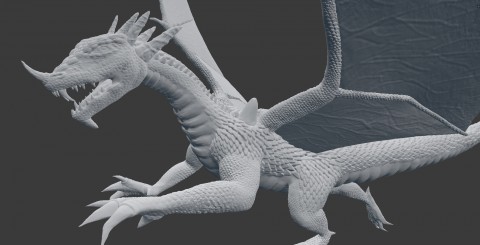
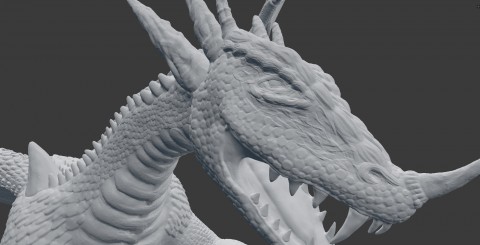
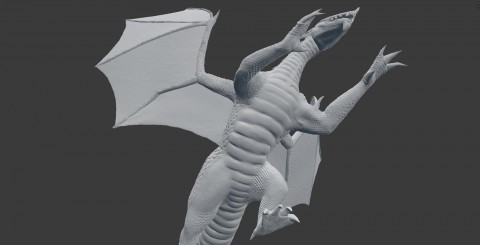
The old dragon was very low poly and had rather skinny limbs. Nonetheless, the pose was quite dynamic and I used the same pose for the updated dragon. The old model was used as a base for dynamic sculpting in blender. In accordance with the new logo on the flag, I added some more horns and spikes, adjusted the wings and added a few tiny fins on the back and tail. A toothless baby dragon, that couldn't even scare your grandma was reborn as a mighty predator, worthy to be symbol of the ferociousness, with which the Red Dragons fight for what they believe in. The high poly model ended up with about 12 million tris. I had to reduce tris count several times during the sculpting process. Editing became somewhat slow after a while (should have bought more RAM). Still, I enjoyed working on the dragon a lot, this was one of my favorite projects so far.
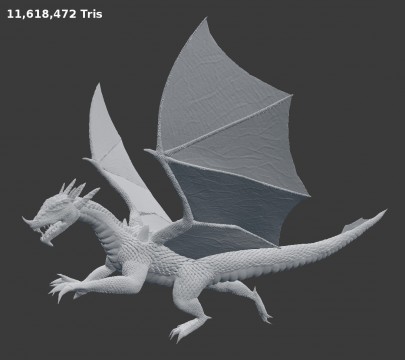
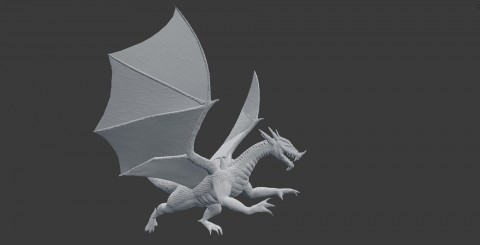
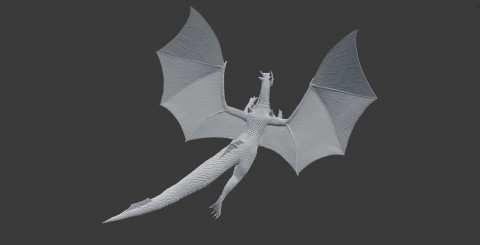
After the high-poly model was done, I used remeshing algorithms and manual adjusting to create a low poly model, which is used in-game. I baked a normal map and an ambient occlusion map from high- to low-poly to fake most of the detail. The model used in the game has about 8500 tris.
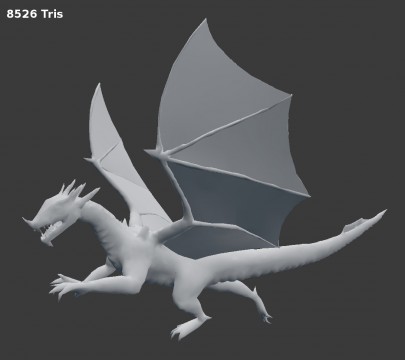
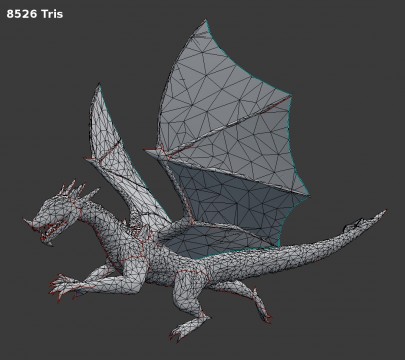
Apart from a very awesome flag ornament, we also could use a larger size version of the dragon as a statue in some maps, lobby screens or similar places.
This concludes my little blog post. I hope you enjoyed reading it as much as I enjoyed creating the new art.
Have a happy day! :)
Let's start with flags

They are very similar to the old urt 4.x flags. They consist of a pole, a simple, rectangular flag cloth, pointing to the side and a golden ornament at the top. When I was working on the flags, I considered changing the shape to something more like a banner, the flag cloth hanging down from a horizontal bar. Possibly adding a second, smaller triangular cloth or other variations. Ultimately I stuck to the old, proven design. Different banner versions can always be added later for map specific flags. This time around, thanks to Unreal Engine 4's wind system, the flapping of the cloth is determined by wind sources placed in the map. It is the level designer's choice how the flags behave in each part of the map. Inside, without wind, they might just hang down, while outside they flap like a chicken that is being chased by an angry fox. Here's a short demo showing a moderately strong wind effect.
New to the game are also two cords and tassels hanging down the pole. I think that makes the flags look a bit more interesting and adds a feeling of preciousness and aesthetics to the otherwise rather simple design. The cords consist of a few physics bodies that react to gravity and any obstacles. So they will move, when a player bumps into them, or has a flag on his back and is running around.
Logos
In case you don't have a clear picture of the old 4.x flags in your mind, here's a screenshot to help you compare. As you can see, the logos have slightly changed. The blue team, the Urban Terror Response Team (UTRT) still has the three bullet shells on the striped background, but now resembling the UrT logo a bit more.
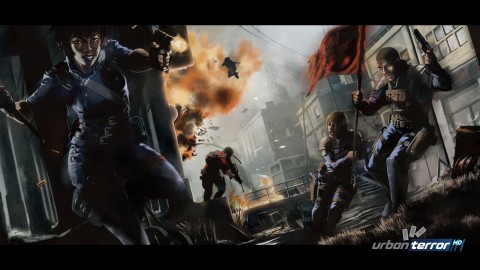
The logo of the Red Dragons has changed from a white dragon in side view to a gold and black dragon in frontal view, which in my opinion looks far better. I took both designs from nounou's awesome concept art. Here's one of them, added for your pleasure.

There also needs to be a neutral (grey) flag for some game modes, but I haven't found the time yet to work on that.
Dragon
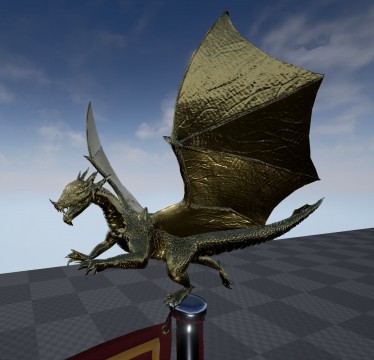
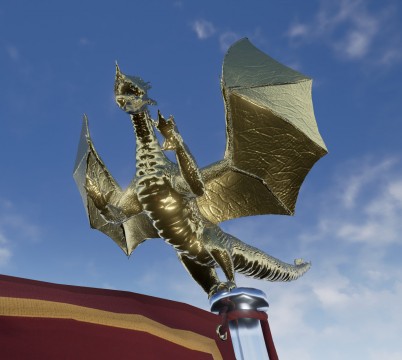
The ornament on top of the red flag is UrT's iconic red dragon, which received a major update. Here are two in-game shots.


The old dragon was very low poly and had rather skinny limbs. Nonetheless, the pose was quite dynamic and I used the same pose for the updated dragon. The old model was used as a base for dynamic sculpting in blender. In accordance with the new logo on the flag, I added some more horns and spikes, adjusted the wings and added a few tiny fins on the back and tail. A toothless baby dragon, that couldn't even scare your grandma was reborn as a mighty predator, worthy to be symbol of the ferociousness, with which the Red Dragons fight for what they believe in. The high poly model ended up with about 12 million tris. I had to reduce tris count several times during the sculpting process. Editing became somewhat slow after a while (should have bought more RAM). Still, I enjoyed working on the dragon a lot, this was one of my favorite projects so far.


After the high-poly model was done, I used remeshing algorithms and manual adjusting to create a low poly model, which is used in-game. I baked a normal map and an ambient occlusion map from high- to low-poly to fake most of the detail. The model used in the game has about 8500 tris.


Apart from a very awesome flag ornament, we also could use a larger size version of the dragon as a statue in some maps, lobby screens or similar places.
This concludes my little blog post. I hope you enjoyed reading it as much as I enjoyed creating the new art.
Have a happy day! :)
comments: Feel free to discuss this on our forums
Working on Uptown #02 - Wall Lamp
posted Saturday, 25 July 2015
Here's another video of me working on uptown. All the positive feedback of the last video motivated me to do more. This time there are some annotations and the end is at normal speed. This episode features a simple wall lamp that's used throughout the map. The whole process took a bit more than an hour (+ 1h of me trying stuff, that didn't work, which I cut out).
Enjoy.
Enjoy.
comments: Feel free to discuss this on our forums
Working on Uptown #01 - Street Pavement
posted Sunday, 19 July 2015
I've been thinking about making videos of me working on uptown for quite a while now. Finally, here's the first of hopefully many videos. This one shows me modeling part of Uptown's street. I initially recorded myself talking while I was working on this but it just sounded too awkward, so I decided to speed the video up and add some intense music. This is the result.
Let me know what you think of this kind of video format.
Let me know what you think of this kind of video format.
comments: Feel free to discuss this on our forums
Advertisement
Uptown HD Jumps 1.0
posted Thursday, 16 July 2015
With the recent work Zenity and Barbatos have done on the movement system it's time to show some jumping skills. We're not quite where we want to be yet, but the game definitely starts to feel like Urban Terror. The jumping is close enough to urt 4.x to do some of the most iconic jumps on uptown. With a little more tweaking (and more jumping practice on my side) things will feel smoother in future videos. You can also check out some of the progress I've made on recreating uptown for HD. At the moment the map looks quite messy and not very pleasing to the eye but that'll change, too.
There's not much more to say at this point except: enjoy the video.
There's not much more to say at this point except: enjoy the video.
comments: Feel free to discuss this on our forums
Chill to this instrument of terror
posted Saturday, 23 August 2014
While working on uptown is my main focus, building houses all day gets a bit monotonous after a while. To spice things up for myself I was looking for something else to model and I felt like a ukulele model would be a nice little project. Since I own a ukulele it was quite easy for me to get the correct measurements for the model and I didn't have to search for references at all. The model has about 3000 tris, which is not very much compared to the example UE4 content from Epic Games but I still want to create a LOD model for it later. I can also use the uke as a base to build other instruments like guitars, violins, etc. So you can expect some random instruments waiting to be played (or shot at) in the future UrT HD maps.
Ok, back to working on uptown now, cya later :)
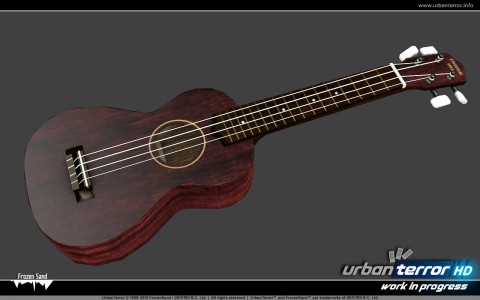
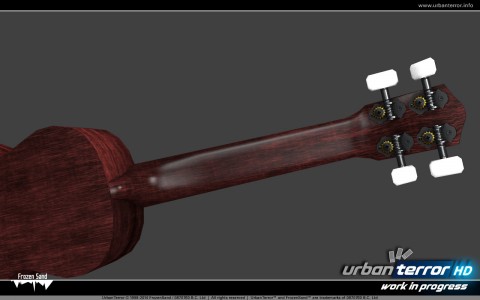
Ok, back to working on uptown now, cya later :)


comments: Feel free to discuss this on our forums
Rebuilding Uptown's Geometry
posted Wednesday, 25 June 2014
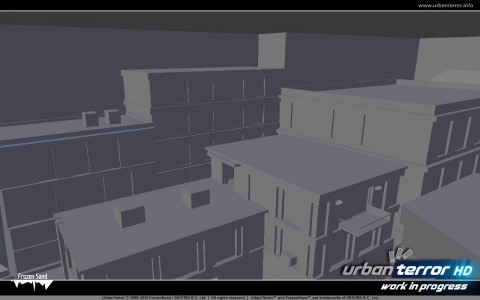
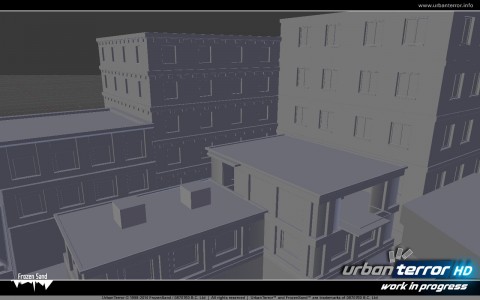
There's not too much happening on uptown at the moment but I thought I'll show you a screenshot anyway. I'm still in the process of rebuilding all the geometry. There's no textures yet, no fancy lighting, just grey buildings. You can compare the current buildings to the old 4.x ones. I added some more detail especially around the windows and trims of the buildings. I also adjusted the scale of the windows and buildings because some of it was really off. Notice how flat the two buildings on the left look in the old version. There are a lot more things off scale in Uptown and some very unrealistic stuff that I will elaborate on in a future blog entry.
Old:
New:
That's it for now,
Have a happy day! :)
Old:

New:

That's it for now,
Have a happy day! :)
comments: Feel free to discuss this on our forums
Advertisement
Car tire model explained
posted Monday, 12 May 2014
Welcome everybody to my blog. In this blog I will mainly talk about level design, modeling, texture creation and any other creative work I do while working on Urban Terror HD. Why? Because I like to show off work that I'm proud of. :)
When working on a map I usually start with the things that give me the most joy working on and I procrastinate doing the boring work, even if that's what actually should be done first. So in my first blog entry I'll show you screenshots of one of the first models I created for Urt HD and I'll explain a bit how I did it. If you have no experience in level design this might give you a glimpse of how the environments in games are created. If you are a mapper you might learn some new technique. In any case I hope you'll enjoy reading this post.
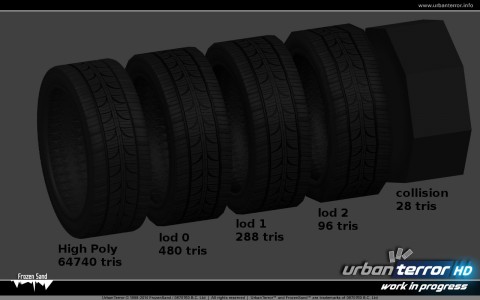
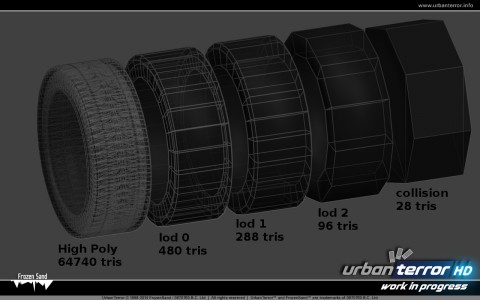
When creating a game asset I always start with a high poly model that has tons of detail. I use blender as my 3D application of choice but 3ds Max or Maya are just as good (those two are actually the industry standard). You can see the high poly version of a car tire I modeled on the very left on the two images below. The first screenshot shows the models in solid mode, the second one shows the wireframe. As you can see, all of the detail is actually in the model, there is no texture used on the high poly model, just a basic black color. In case you didn't know, game engines break down surfaces into triangles (tris for short) no matter what shape the surface initially has. The more tris your graphics card has to render, the lower your fps (frames per second) will be. 64740 tris is obviously too much to be used in a real time game for such a simple object. In current UrT maps somewhere around 20k - 50k tris are drawn at any given time for the whole map (!). So, since the high poly model is far too complex to be used as is, lower resolution models have to be used and much of the detail has to be faked by textures.
A series of low poly models labeled lod 0 - lod 2 (lod = level of detail) are actually used in the game. The lod 0 model is used when you are very close to the model. The further away you get, the smaller the object will be on your screen and the less detail you will be able to see. That's why the lod 0 model automatically gets replaced by a lower detail lod 1 model at a certain distance. If done correctly you won't even be able to see the switch happening. In theory any number of lods can be used but at some point it's not worth the effort to create them or it's not even possible to reduce the tris anymore. In this case I used three different lod models.
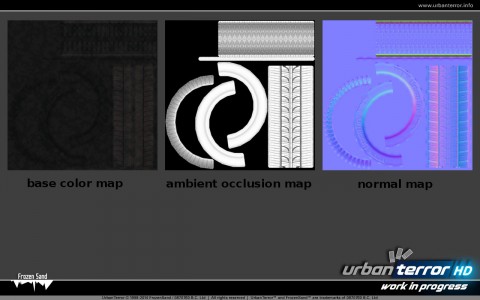
Now let's talk about getting the detail of the high poly model onto the low poly models. That's the job of the textures. Each model uses several different textures which are more or less important. The image below shows the three main textures I use for the tire model. The base color map (also called diffuse map) defines, like the name suggests, the color of the model. I created this texture with the free version of dDo, an awesome photoshop add-on that makes it so easy to create amazing textures for your models. The ambient occlusion map and normal map are generated in blender from the high poly model in a process called "baking". All of the detail of the high poly model is baked to a texture that can be used on a low poly model. The ambient occlusion map fakes the darker, more concealed areas of the model, whereas the normal map shows the direction the surfaces are facing in the world. The latter information is used to make light and shadow behave as if there was all this detail in the model. The textures play such an important role in how realistic an object looks, they almost work like magic :) . Having explained this, take another look at the first image and note how you can hardly see any difference between the high poly model and lod 0. All the lod models use the ambient occlusion map and normal map generated from the high poly model.
You might have wondered what the collision model in the first two images is all about. Determining where a player can walk and where his path is blocked is computationally a very expensive task. Poor collision has an even greater impact on fps as poor modeling. That's why it's important to keep the collision as simple as possible and therefore I created yet another, even simpler version of the car tire that will be invisible in the game and is only used to block the player. Most people do not realize how simple and blocky the environments in games really are. The visuals may be highly detailed and realistic but the movement is limited by flat walls and big cubes.
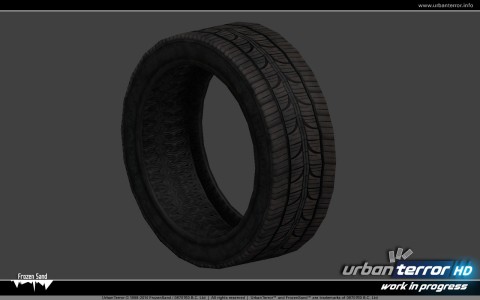
Putting all this together, the lod models, the collision model and several textures we end up with one simple game asset that can be placed in any map:
Did you like this post? Would you like to see more of these entries focusing on level design? Let me know what you think.
And as always, have a happy day! :)
When working on a map I usually start with the things that give me the most joy working on and I procrastinate doing the boring work, even if that's what actually should be done first. So in my first blog entry I'll show you screenshots of one of the first models I created for Urt HD and I'll explain a bit how I did it. If you have no experience in level design this might give you a glimpse of how the environments in games are created. If you are a mapper you might learn some new technique. In any case I hope you'll enjoy reading this post.
When creating a game asset I always start with a high poly model that has tons of detail. I use blender as my 3D application of choice but 3ds Max or Maya are just as good (those two are actually the industry standard). You can see the high poly version of a car tire I modeled on the very left on the two images below. The first screenshot shows the models in solid mode, the second one shows the wireframe. As you can see, all of the detail is actually in the model, there is no texture used on the high poly model, just a basic black color. In case you didn't know, game engines break down surfaces into triangles (tris for short) no matter what shape the surface initially has. The more tris your graphics card has to render, the lower your fps (frames per second) will be. 64740 tris is obviously too much to be used in a real time game for such a simple object. In current UrT maps somewhere around 20k - 50k tris are drawn at any given time for the whole map (!). So, since the high poly model is far too complex to be used as is, lower resolution models have to be used and much of the detail has to be faked by textures.
A series of low poly models labeled lod 0 - lod 2 (lod = level of detail) are actually used in the game. The lod 0 model is used when you are very close to the model. The further away you get, the smaller the object will be on your screen and the less detail you will be able to see. That's why the lod 0 model automatically gets replaced by a lower detail lod 1 model at a certain distance. If done correctly you won't even be able to see the switch happening. In theory any number of lods can be used but at some point it's not worth the effort to create them or it's not even possible to reduce the tris anymore. In this case I used three different lod models.


Now let's talk about getting the detail of the high poly model onto the low poly models. That's the job of the textures. Each model uses several different textures which are more or less important. The image below shows the three main textures I use for the tire model. The base color map (also called diffuse map) defines, like the name suggests, the color of the model. I created this texture with the free version of dDo, an awesome photoshop add-on that makes it so easy to create amazing textures for your models. The ambient occlusion map and normal map are generated in blender from the high poly model in a process called "baking". All of the detail of the high poly model is baked to a texture that can be used on a low poly model. The ambient occlusion map fakes the darker, more concealed areas of the model, whereas the normal map shows the direction the surfaces are facing in the world. The latter information is used to make light and shadow behave as if there was all this detail in the model. The textures play such an important role in how realistic an object looks, they almost work like magic :) . Having explained this, take another look at the first image and note how you can hardly see any difference between the high poly model and lod 0. All the lod models use the ambient occlusion map and normal map generated from the high poly model.

You might have wondered what the collision model in the first two images is all about. Determining where a player can walk and where his path is blocked is computationally a very expensive task. Poor collision has an even greater impact on fps as poor modeling. That's why it's important to keep the collision as simple as possible and therefore I created yet another, even simpler version of the car tire that will be invisible in the game and is only used to block the player. Most people do not realize how simple and blocky the environments in games really are. The visuals may be highly detailed and realistic but the movement is limited by flat walls and big cubes.
Putting all this together, the lod models, the collision model and several textures we end up with one simple game asset that can be placed in any map:

Did you like this post? Would you like to see more of these entries focusing on level design? Let me know what you think.
And as always, have a happy day! :)
comments: Feel free to discuss this on our forums

