Advertisement
 Game Manual
User Interface
A Urban Terror Interface Defined
The Urban Terror user interface (UI) has been completely redone and scripted from scratch. Using technology from id Software's latest Quake 3 Team Arena release, we have been able to create some great effects and add many more menus that were not included in Team Arena. The UI is divided into two sections, out of game menus and in game menus. Both can be used to change controls, system settings, player settings, and other applicable settings. In the next few subsections you will find images of what these sections look like and what each button does.B Starting Interface (out of game)
Below is an image of the starting interface, with descriptions each time Urban Terror is loaded.
• To connect to an online game click "Play Online."
• The setup menu will allow you to change your player and keyboard configurations, along with changing values for your video and audio settings.
• To start a server you can manually set it up through the user interface.
• "Other Mods" displays Quake III mods installed on your computer. Urban Terror is reflected in this menu.
• To view "Demos" that have been previously saved.
• If you would like to quit out of the mod and Quake III.
C In Game Interface
Below is an image of the in game interface with descriptions. You can reach the in-game interface by pressing the ESCAPE key while in a game. Once displayed, you have game options you can select as designated by the red numbers in the figure below.
Listed in the image above are ten menus you can access within the user interface:
• About: Tells you infromation about the server you are currently on.
• Player: Join a team, select your preferred weapons/gear or change your player appearance.
• Stats: Allows you to see more detailed statistics on your game than from the scoreboard.
• Controls: Set your binds and controls.
• Options: Choose between different options in this submenu.
• System: Graphic, sound and network settings can be adjusted in this menu.
• Vote: Used to call a vote, change game type, alter server settings or switch maps.
• Rcon: Allows admins and players with rcon password to take control of the server.
• Exit: Let's you quit out of the mod.
D Team Setup & Weapon/Gear Select
When you first join a game, a set of interface elements is brought up that allow you to choose your team and weapons/gear. This can be accessed later while playing, to change teams or weapons, but comes up also upon joining a server for your convenience. These menus can be navigated with both key presses and by pressing the number hot key that appears in the same box as the button you wish to activate. To gain access to these menus again, you can either bind a keys to the team select and gear select menus, or you can hit ESCAPE to bring up the in game interface, then press PLAYER and finally choose either TEAM SELECT or WEAPON / GEAR SELECT. Below are two images to show you what this looks like.important note: you are limited to what you can carry in a few ways, if an item slot has a circle with a slash icon in it and says, "not available" you have reached your current weapon / item limit. To carry more items you must drop your grenades, secondary item or both.
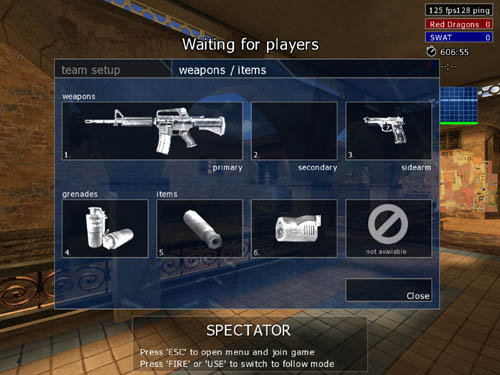
D.1 Team Setup
Choose TEAM SETUP in order to change your status as a player. You have three options available to you when you enter this menu, as listed above in red.• Team selection, you can manually select the 'Red Team' or 'Blue Team'
• Auto-Join will automatically place you on a team, based on the number of gamers currently playing and the score. It is recommended you use this option when connecting.
• If you want to drop off either team and watch. If this is selected, you are still taking one player slot on the server.
D.2 Weapon/Gear Select
Choose the WEAPONS/ITEMS sub-menu in order to load out your player with weapons and gear. You have two weapon slots, your primary (1) and secondary (2). Click on each of these to select your weapons of choice. All weapons are not avaialble as priamry weapons. You must carry a sidearm (3) and have two pistols to select from.Depending on your load out, you can select high explosive or smoke grenades (4). You can also carry up to three pieces of gear (5, 6, 7) depending on weapon selection and grenades. See Section 8.1 - 'Load out information' for a more detailed explanation of loading out your player.
E Selecting Player Model & Race
You can choose your player model both in game and out of game. To choose your model from the user interface, press the SETUP button, followed by the PLAYER button. From this menu you can you select you player model and race depending on your team.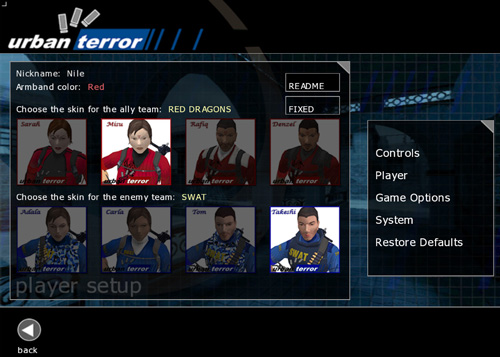
To set up your player in game, press ESCAPE to activate the in game interface, and then press PLAYER, followed by PLAYER SETUP. Both methods will show you a visual representation of how your character will look in game. To change models, scroll through the icons and click to select your choice. Your model will change to reflect your choice.
F Heads Up Display (HUD)
The heads up display or HUD for Urban Terror contains familiar elements such as ammunition, stamina bar/hit model and other information items to use during gameplay. Learning how the HUD operates is vital to playing well in Urban Terror. Below is an image that describes the various components of the HUD.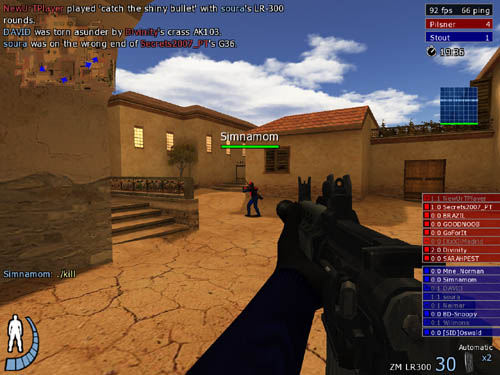
The HUD is configurable to some degree. You have the option to toggle some of the individual components or reposition them on the HUD.
• Minimap: displays teammate positions, medics, captured flags and calls for help. More information is provided on the minimap in Section 4.4.11.
• Hit Detection Model/Stamina Bar: provides hit information when struck by a bullet, as well as providing a visual representation of your current and remaining stamina. Will flash red when you have not been healed.
• Team Overlay: provides kill/deaths of each teammate, along with the number of enemies remaining. Toggle the CVAR by cg_teamoverlay(0/1).
• Weapon Information: shows your current weapon, number of rounds and magazines remaining.
• Scoreboard: consists of each team's score as well as your FPS/ping.
• Wave Respawn Timer: shows the time remaining until gamers on each team respawn (used in CTF).
• Crosshair: shows the player's name and their health when your crosshair is moved over them. The green bar represents health, when injured the green bar turns red to show that a player has been injured.
Note: Some gamers want a visual depiction of their connection, so they also toggle on cg_lagometer 1 in order to monitor the server and client status.
F.1 Mini Map
The mini map is an overhead depiction of the level that is being played on the HUD. It will show a basic layout of the level, including hallways, teammates and flag position (CTF only). The mini-map is very configurable, as there are five CVARs that control the look and position of the mini-map during play.
The mini map can be moved in a counter-clockwise direction around the screen, depending on where you want the placement of it. Along with changing the transparency of the map arrows and the mini map, you can also change the size of the mini map or toggle the mini map on and off.
F.2 Hit Detection & Stamina Bar
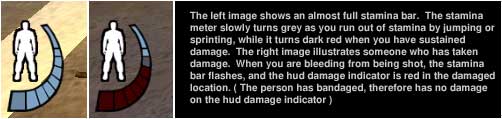
This is located in the lower left corner of the HUD and will provides you a visual representation of your player and full stamina bar. When you are shot, the hit detection model will flash on the corrosponding body part and your stamina bar will start to flash red.
Once you start to bleed your overall health will start to be depleted. Your remaining health, or stamina will be based on how quickly you are able to heal your wounds. The longer you go without healing the more health you loose. Another gamer can heal you back up to 40%, while a medic will be able to heal you back up to 80%. It plays to know your medics and use them.
Your stamina bar will regenerate health are varying rates depending on your movement. If you are sprinting, strafe jumping or jumping in general will burn stamina. Any other movement will regenerate your health. The rate at which your stamina returns depends on your movement. Standing or crouching will regenerate health the quicker than running.
F.3 Team Overlay
The team overlay allows you to view information relating to each team. This overlay is configurable in order to limit the amount of information that can be displayed. There are four options available, including turning off the team overlay completely.If the team overlay CVAR is set to "1" you will see a list of players, back lit by their team color and the number of kill:deaths. This will also display who is still alive. If this is set to "2" you will see only your team's information and the number of remaining enemy. If it is set to "3" you will only see the number of alive teammates and the number of alive enemy.
F.4 Weapon Information
Located in the lower right corner of the HUD, this area is reserved for your weapon information. A quick glance will allow you to see your current weapon selected, the number of rounds remaining and the number of unused magazines in your inventory.If you do not use up the full magazine before you reload, you will loose the remaining ammunition in your current clip. Any time you collect ammunition for the weapon you are using, the number of clips will be changed to reflect that.
F.5 Mini Scoreboard
The mini scoreboard is located in the upper right corner of the heads up display and will display each team score. This scoreboard can be toggled on and off.F.6 Wave Respawn Timer
This option allows you to see the time remaining until the next respawn. This is mainly used for CTF. In order for the wave respawn timer to work, it must be enabled on the server. Instead of dying and having to sit out for an amount of time, the wave respawn timer is set by the server admin and gamers on each side respawn ogether, in a wave as opposed to individually.Crosshair
While the main purpose of the crosshair allows you to aim your weapon at the enemy, it can also be used to acertain information from your teammates. When you place your crosshair over a teammate you can identify the individual and see their current health status.
When a player has been shot and injured, the green bar will be replaced with a red bar, showing their remaining health. This is a useful tool for medics and player alike. In a glance you can see who is injured and potentially heal them.
G Visible Gear/Weapon Interface
Urban Terror features a unique system of icons that are displayed when switching weapons or items listed in your inventory. Opaque boxes are displayed in the lower, center of your HUD that presents easily identifiable items, along with the ability to see what you are currently carrying at a glance. The current weapon/gear you are using will be back lit white. Below is an example image of how this looks in game.
The two primary features in the above image shows a player's current inventory. You can see the boxes of icons (1) that represent each piece of gear or a weapon in the player's inventory. The player above has the HK G36 selected and is scrolling through their inventory. (2) is the icon that appears when you select the bomb from your inventory (available only in Bomb mode). Once the bomb is selected, you cannot carry a weapon, it must be shouldered, in order to arm and plant the bomb.
H Radio Interface
In Urban Terror, radio communication accommodates both advanced and new users with ease. Depending on your personal preference you can either use the in game radio interface or you can bind specific radio commands to keys like other actions. Most users will bind the most commonly used radio commands to keys, while using the radio interface for less commonly used keys. Below are two images, with information below that on how the system works.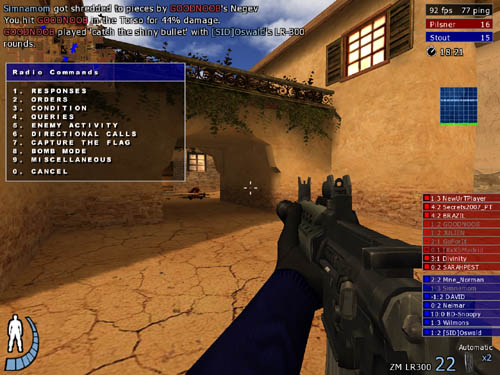
The first menu appears when you press the key bound to open the radio menu (ut_radio). You have a choice of radio menus: Responses, Orders, Statements Condition, Queries, Enemy Activity, Directional, Capture the Flag, Bomb and Miscellaneous. Press a number key, or click the section you want with your mouse.
The second screen opens after you press a number key or make a selection. Here is where the actual radio commands are located. This menu operates identical to the first menu where both number key or mouse click play the radio command.
H.1 Radio Command Chart
| Menu 1 | Responses |
| ut_radio 1 1 | Affirmative. |
| ut_radio 1 2 | Negative. |
| ut_radio 1 3 | I'm on it! |
| ut_radio 1 4 | Area secured. |
| ut_radio 1 5 | Base is secure. |
| ut_radio 1 6 | Medic on the way, hang in there. |
| ut_radio 1 7 | I've got your back. |
| ut_radio 1 8 | Enemy terminated. |
| Menu 2 | Orders |
| ut_radio 2 1 | Move in. |
| ut_radio 2 2 | Fall back and regroup! |
| ut_radio 2 3 | Hold your position. |
| ut_radio 2 4 | Stick with me. |
| ut_radio 2 5 | Cover me. |
| ut_radio 2 6 | Requesting backup. |
| ut_radio 2 7 | Go for the objective. |
| ut_radio 2 8 | Flank them! |
| ut_radio 2 9 | Double time, let's move! |
| Menu 3 | Conditions |
| ut_radio 3 1 | I'm moving in. |
| ut_radio 3 2 | Awaiting orders. |
| ut_radio 3 3 | I need a medic! |
| ut_radio 3 4 | Objective in sight. |
| ut_radio 3 5 | Objective is clear. |
| ut_radio 3 6 | I'm attacking. |
| ut_radio 3 7 | I'm defending. |
| ut_radio 3 8 | I'm flanking. |
| ut_radio 3 9 | Holding here. |
| Menu 4 | Queries |
| ut_radio 4 1 | Status? |
| ut_radio 4 2 | Objective status? |
| ut_radio 4 3 | Base status? |
| ut_radio 4 4 | Where's the enemy? |
| ut_radio 4 5 | Where are the medics? |
| ut_radio 4 6 | Anyone need support? |
| ut_radio 4 7 | Anyone need a medic? |
| ut_radio 4 8 | Who's ya daddy? |
| ut_radio 4 9 | How the hell are ya? |
| Menu 5 | Enemy Activity |
| ut_radio 5 1 | Enemy spotted. |
| ut_radio 5 2 | Enemy heard. |
| ut_radio 5 3 | Enemy is flanking! |
| ut_radio 5 4 | Enemy headed your way! |
| ut_radio 5 5 | Incoming! |
| ut_radio 5 9 | Objective in danger! |
| Menu 6 | Directional |
| ut_radio 6 1 | North. |
| ut_radio 6 2 | South. |
| ut_radio 6 3 | East. |
| ut_radio 6 4 | West. |
| ut_radio 6 5 | base. |
| ut_radio 6 6 | High. |
| ut_radio 6 7 | Low. |
| ut_radio 6 8 | Water. |
| ut_radio 6 9 | Here. |
| Menu 7 | Capture the Flag |
| ut_radio 7 1 | I've got the flag. |
| ut_radio 7 2 | I'm going for the flag. |
| ut_radio 7 3 | They have our flag. |
| ut_radio 7 4 | Base is being overrun! |
| ut_radio 7 5 | Recover the flag! |
| ut_radio 7 6 | Flag exiting left. |
| ut_radio 7 7 | Flag exiting right. |
| ut_radio 7 8 | Flag exiting front. |
| ut_radio 7 9 | Flag exiting back. |
| Menu 8 | Bomb |
| ut_radio 8 1 | Heading to Bombsite A. |
| ut_radio 8 2 | Heading to Bombsite B. |
| ut_radio 8 3 | Enemy at Bombsite A. |
| ut_radio 8 4 | Enemy at Bombsite B. |
| ut_radio 8 5 | I have the bomb. |
| ut_radio 8 6 | The bomb is loose! |
| Menu 9 | Miscellaneous |
| ut_radio 9 1 | Good job team. |
| ut_radio 9 2 | Nice one. |
| ut_radio 9 3 | Check your fire! |
| ut_radio 9 4 | Sorry about that. |
| ut_radio 9 5 | Whatever. |
| ut_radio 9 6 | No problem. |
| ut_radio 9 7 | Oh, you idiot! |
| ut_radio 9 8 | What the f*ck, over? |
| ut_radio 9 9 | Thanks. |
H.2 Binding Radio Commands
Radio messages can be played through the user interface by having a key bound to ut_radio. or played through key bindings in .cfg files. To bind a key to play a specific message, use this example:/bind x ut_radio y z
In the above example 'x' equals the key you press to play the sound, 'y' equals the menu number of the radio command and 'z' equals the sound file within that menu. The menus and radio commands are numbered 1 to 9.
The first menu in Radio Command Chart is 'Menu 1' or "Responses", so the number for a radio command within responses would '1' . This also means that inside the "Responses" menu the same rules apply. The first sound is "Affirmative", so that sound is designated 1.
So if we wanted to bind a key to play the sound "Enemy spotted", found in Menu 5 - Enemy Activity, we would type the following in the console:
/bind x ut_radio 5 1
Remember, 'x' still equals the key you want bound and that you need a space between ut_radio and the first number - along with a second space between the first and second numbers.
While radio calls can be effective, combining a radio call with text and a string variable is possible.
/bind x ut_radio 3 3 I need a medic! $health
This bind, while a bit more advanced takes a radio call, displays the words "I need a medic" and also displays the remaining percentage of health (string variable) of the gamer. This is just one example of how you can combine the different pieces in order to create unique radio calls.
There are different radio messages for males and females. The meaning behind the messages is the same for both male and female, but the female voice will often say different things. A full listing of the radio commands for are found in the Radio Command Chart.
I Scoreboard
The Urban Terror scoreboard is not readable at a glance, but provides important information such as status, player name, kills, deaths, ping and time. You can access the scoreboard by binding a key to "+scores" without the quotes. The default key to show scores is TAB. Below is an image of the scoreboard.
There are two components to the Urban Terror scoreboard. The team header (1) shows which team (red or blue) the players are on, along with total players on that team, the team name (currently showing Blue Team) and the team score. (2) Underneath the team header are the individual players who make up that particular team. Details include status, player name, kills, deaths, time and ping.
J Mini Map
J.1 Defined
The minimap can be used in both, team and free for all games. If used in a team play mode, like CTF or TS, then you will be able to see all your teammates who are alive. In CTF, you will also see the current positions of the maps. In free for all games, all the player triangles are represented in yellow.
In the first pane, you are on the blue team, as you can see your blue teammates, on the map ut_docks, with the red flag near the water. Pane two, shows a blue gamer who has grabbed the red flag and is making their way back to the blue flag. Finally, in pane three, we see a free for all game, as only a single, yellow triangle is represented.
Using cg_maptoggle
You can use this command in a script form or a straight bind. To bind it in a single command line drop into the console and type:
bind key "toggle cg_mapToggle"
If you want to use it in a script and get a bit fancy you can cut and paste this into your config file:
set mt_01 "set map_t vstr mt_02; set cg_mapToggle 1; ut_echo Mini-Map On"
set mt_02 "set map_t vstr mt_01; set cg_mapToggle 0; ut_echo Mini-Map Off"
vstr mt_01 // Default
bind x "vstr map_t" // Toggle Mini-Map
In this script, you can replace the 'x' key with whatever key you want to bind it to. Also note that you cannot bind any of the cg_map commands in the setup menu, they must be configured
K Specific Commands & Features
K.1 Stop Bleeding
When you get shot you start to bleed. The location in which you were hit and the number of times you were hit determines the amount of health you lose each second. To stop yourself from bleeding you need to bandage your wounds. You can bandage wounds in two ways: bandage yourself with the bandage command (most people will bind a key to bandage using the CONTROLS-> SPECIAL menu). The second way to bandage your wounds is to have a teammate heal you.K.2 Healing Teammates
In order to promote teamwork it is possible to act as a medic and heal your teammate when their health drops to near fatal levels. To heal a teammate, walk up to your injured teammate, press the your bandage key and the player will rejuvenate health. Without the aide of a medkit players can heal back to 40% health and 80% with the medkit.K.3 Ledge Grabbing
Ledge grabbing adds a vertical component to first person gaming. This feature allows a player to run, jump, and grab the ledge of any structure (for example, a building ledge or crate) within an Urban Terror level.To perform the ledge grabbing maneuver run towards a structure and jump for the ledge. If you reach the edge of the structure, keep the jump key depressed and you will pull yourself up. The only limitation is, you must be able to reach the ledge, if not you will fall, injuring yourself or worse yet, kill yourself.
K.4 Wall Jumping
Wall jumping adds another dimension to Urban Terror by applying physics allowing extra movement. As you run or sprint towards a wall, you can jump into the wall and rebound off the wall, allowing for more stylized movement. This features opens up a whole new range of combat and movement skills. You cannot wall jump off short ledges or other gamersK.5 Power Sliding
To execute a power slide, you must increase your speed by sprinting or strafe jumping and while airborne, prior to hitting the ground press your crouch key. This will result in your player model landing on the ground in a crouch and sliding across the surface.The 'XY' and 'XYZ' in the corner of the HUD reflect the speed of your player in the game when your player is moving. The higher your numbers, the better the powerslide. The minimum speed, is about 300, but the higher the number, the more effective powerslide you will get. This display will be controlled by the cg_speedo CVAR .You can view a video of powersliding, here.
K.6 Goomba Stomp
This is a feature that requires some good timing and skill in order to jump down, land on an opponent and "stomp" them to death. Be careful, as you can g00mba stomp a teammate. This is also a feature that does not happen often during game play.K.7 Toggling Items
It's difficult to ambush the enemy if your laser sight is shining on a wall and giving away your position. You can toggle the laser sight, silencer and tactical goggles in Urban Terror by pressing the use item ut_itemuse key.This key is bound in the SETUP -> CONTROLS -> MISCELLANEOUS menu, and can also be set in the console (press tilde ~ to get into the console) by typing:
/bind key "ut_itemuse"
You must have the item you want to toggle on/off in the FIRST SLOT of your gear inventory. If it is in the second or third position, then you will have to cycle through your gear to get to it, then activate it.
K.8 Opening Doors
You can control the direction the doors open in Urban Terror. Hold down the walk forward or backpedal key when you press the 'ut_opendoor key'. It takes some coordination and practice to master, but will stop players from camping in front of doors and holding them closed.Alternate Firing Modes
Many of the Urban Terror weapons come with different firing modes, such as semi-automatic, full-automatic and burst mode. There are times when it will work to your advantage to use each different mode. Remember to bind it in the menu. For weapon specific information see Section 7.2.
K.9 Assigning String ($) Variables
Gamers are able to give more information to their teammates by using the string variables. There are nine variables that can be included in any "say" statement. This information will be transmitted if you have it bound. The string variables include:| Variable | Description |
|---|---|
| $crosshair | shows current location under crosshair |
| $location | shows current location on a level |
| $health | shows your current status |
| $hp | shows your current health points |
| $weapon | shows the current weapon you are carry |
| $clips | shows number of clips remaining |
| $bullets | shows number of bullets in your current clip |
| $gameitem | represents the game item (flag or bomb) in some gametypes |
| $gametime | prints the map's remaining time |
| $roundtime | prints the round's remaining time |
| $leader | will tell you who is currently the leader |
An example of using the string variables could be:
bind 2 say "I have the $gameitem!!"
The result on screen would look like, "I have the flag!!" The examples are endless, be creative, you can also combine them with radio calls to create your own unique commands. So you could combine $location, $health and $gameitem to let your teammates know where you are, your current health and that you have the flag.
K.10 Breakout Key Assignments
What's the best way to kill time while waiting to respawn? To play Breakout, what else?breakout_play
breakout_reset
breakout_pause
breakout_left
breakout_right
K.11 Snake Key Assignments
What's the next best way to kill time while waiting to respawn? To play Snake, what else?snake_up
snake_down
snake_left
snake_right
snake_pause
snake_play
snake_reset
If you get bored with these games, you can always go in search of the space monsters.
By FrozenSand - Saturday, 07 November 2009 - viewed by 6650 members and 105152 visitors
Advertisement